
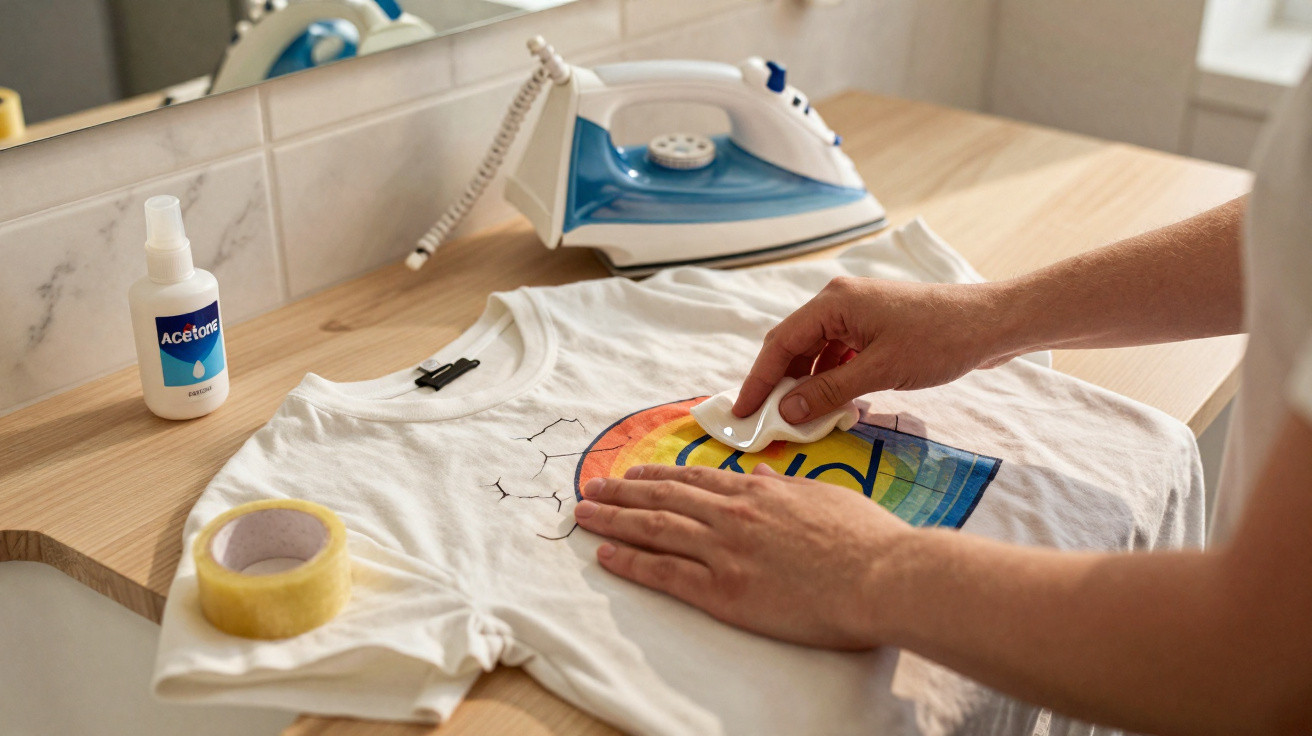
Many people reach straight for the discard pile, even though the print can often be rescued remarkably well.
Printed T-shirts rarely wear out because of the fabric itself; it is usually the design that ages first. The print becomes brittle, develops tiny cracks and loses its sheen. At that point, the shirt is quickly consigned to the bag for unwanted clothes. Yet a practical trick shows that a cracked print can be given a second chance with a simple bathroom product and an iron - no professional workshop or specialist machine required.
Why T-shirt prints quickly start to look worn
Most high-street fashion chains use inexpensive screen prints or vinyl prints. They look impressive when new, but are sensitive to friction, wash temperatures and incorrect drying. The fabric itself often lasts far longer than the design.
The areas most commonly affected are:
- The chest and stomach, as the fabric stretches considerably when sitting down or bending
- The sides, where hands frequently brush against the material
- The area beneath a belt, where jeans buttons or straps cause rubbing
Once a print starts cracking, the choices often seem limited: keep wearing it with a “used look”, banish it to the back of the wardrobe, or throw it away. A little-known technique offers a fourth option: repair it.
“A commonly available bathroom solvent can soften cracked prints enough for heat to smooth and seal them again.”
The surprising bathroom remedy for T-shirt prints
This method relies on acetone, a substance found in many nail polish removers. It affects plastics, but can also soften them in a controlled way without destroying them completely. That is precisely what makes it useful for a T-shirt print.
Only a few items are needed, and most households will already have them:
- Nail polish remover containing acetone (check the ingredients list)
- A cotton pad or small piece of cotton wool
- An iron with adjustable temperature settings
- A thin cotton cloth or an old tea towel to act as a protective layer
Each item serves a specific purpose: the cotton controls the amount of liquid, the solvent softens the print surface, the cloth prevents direct heat exposure, and the iron compresses the print again.
Step by step: rescuing cracked T-shirt designs
1. Preparation: inspect the design and define the area
Lay the shirt flat on a firm, smooth surface. It should be clean and completely dry. Use your hand to smooth out any creases around the design as thoroughly as possible.
Look closely at the damage: are there only fine hairline cracks, or are larger sections already flaking away? The method is particularly suitable for:
- Fine cracks and light fracture lines
- Designs that have become dull and slightly brittle
- Prints beginning to lift slightly around the edges
If large pieces of the design are already missing, this technique can only improve its appearance to a degree; it cannot restore it completely.
2. Apply acetone sparingly - dab, do not rub
Lightly moisten a cotton pad with acetone-based remover. It must not be dripping wet. The rule is simple: use as little as possible, but as much as necessary.
“The aim is to soften only the print surface, not to soak the whole area.”
Place the pad directly on the cracked sections and dab gently. Do not wipe forcefully or scrub. Dabbing allows the solvent to reach the fine cracks without tearing away brittle particles.
Work in small sections, roughly the size of your palm. After a few seconds, the print should feel a little softer, almost rubber-like. That is exactly the effect required.
Using heat to draw the cracks back together
3. Add a protective layer - never iron directly onto the design
Before using the iron, place a thin cotton cloth smoothly over the design. This layer prevents the print from sticking to the iron’s soleplate or developing shiny patches.
Set the iron to a medium temperature; the cotton setting without steam is usually ideal. Turn off the steam, as dry heat is easier to control here.
4. Iron briefly and precisely - smooth the print, do not flatten it
Apply the iron with gentle pressure to the cloth directly above the treated area. Leave it in one place for only a few seconds, then lift it and place it down again slightly alongside the previous spot. Do not slide it as you would during normal ironing; use a series of brief presses instead.
“With heat, the softened micro-fragments of the design bond together more firmly again - the cracks become finer or may almost disappear visually.”
After one pass, lift the cloth briefly and inspect the result. If the design is smoother but still slightly uneven, repeat the process once. Importantly, always allow the material to cool briefly between applications.
How much a T-shirt print can be saved - and the limits
The result depends greatly on the print material and the age of the T-shirt. Relatively new vinyl prints often respond surprisingly well: cracks visibly pull together and the surface looks more sealed again.
On very old screen prints, the technique can reduce the “crater effect”. The design then appears less crumbly and more like an intentional vintage look, but without deep fracture edges.
| Starting condition | Realistic result |
|---|---|
| Fine cracks, with the print still fully present | The print looks noticeably smoother; cracks are visible only at close range |
| Several obvious fracture lines and light flaking | A calmer-looking surface and visually reduced cracks, but not a “like new” result |
| Large parts of the design missing | Only a visual improvement is possible; gaps remain visible |
What you should never do
Although the method sounds straightforward, a few mistakes can quickly spoil the result:
- Do not pour nail polish remover directly onto the shirt
- Do not treat large areas of fabric; work only on the design
- Do not rub in circular motions, as this loosens particles
- Do not use the iron at maximum temperature, especially on synthetic fabrics
- Do not begin without testing first: check an inconspicuous corner beforehand
A test on the hem is particularly worthwhile with coloured fabrics. Some textile dyes react sensitively to solvents and may run.
Keeping the “new old” print looking good for longer
Once the shirt is wearable again, the care routine becomes especially important. A print that has been softened once does not cope well with extreme conditions.
- Turn the T-shirt inside out before putting it in the washing machine
- Avoid 60°C washes - 30°C is sufficient in most cases
- Avoid the tumble dryer; air-drying is far kinder to the print
- Always place a cloth over the design when ironing
Anyone who consistently washes at high temperatures and uses the tumble dryer will significantly shorten the print’s lifespan, even after the repair.
Why the effort is worthwhile - for more than appearance alone
Every T-shirt kept out of the bin saves resources: water, cotton, chemicals, and the energy required for production and transport. Repairing rather than discarding may seem insignificant on an individual level, but its cumulative impact is noticeable.
There is also sentimental value. Concert T-shirts, holiday souvenirs and that one old favourite shirt are tied to memories. For garments like these, this technique can quickly become a go-to routine before reaching for the scissors or the bag for unwanted clothes.
Those who enjoy experimenting can also use the method deliberately as a design tool. Some smooth only part of the print to create a controlled vintage look. Others combine the repair with an upcycling project - for example, by transferring an old design from a shirt onto a bag.
Even so, acetone remains a solvent: use it sparingly, ventilate the room well, and avoid skin contact wherever possible. With a steady hand and a little care, this method can extend the life of many favourite T-shirts - unexpectedly turning a bathroom shelf into a small textile repair station.



Comments
No comments yet. Be the first to comment!
Leave a Comment